Welcome to My First Blog
astro
tailwind
javscript
html
Hey I’m William Kim
If you are reading this, then this is just one of out many more blogs to come as I share my journey and experiences as a developer. While I’m no expert, my hope is that by a year or so from now I can look back and see my growth - where I’ve improved or fallen short of my goals. While I have made blogs for other organizations, this is a more personal and introspective take that has more flexibility in terms of content and topics.
To start off this first entry, I’d like to dive into how I built this website from the ground up. Prior to any development, I wanted to explore a different framework that was optimized for a content-driven application. A popular convention these days is to use something like React or Next.JS, both of which are great for their use cases. However, I needed a middle ground that offered performant DOM rendering and low javascript payloads, while providing good DX in managing my personal content. After some research, I stumbled on Astro which seemed to offer everything I needed for this new project.
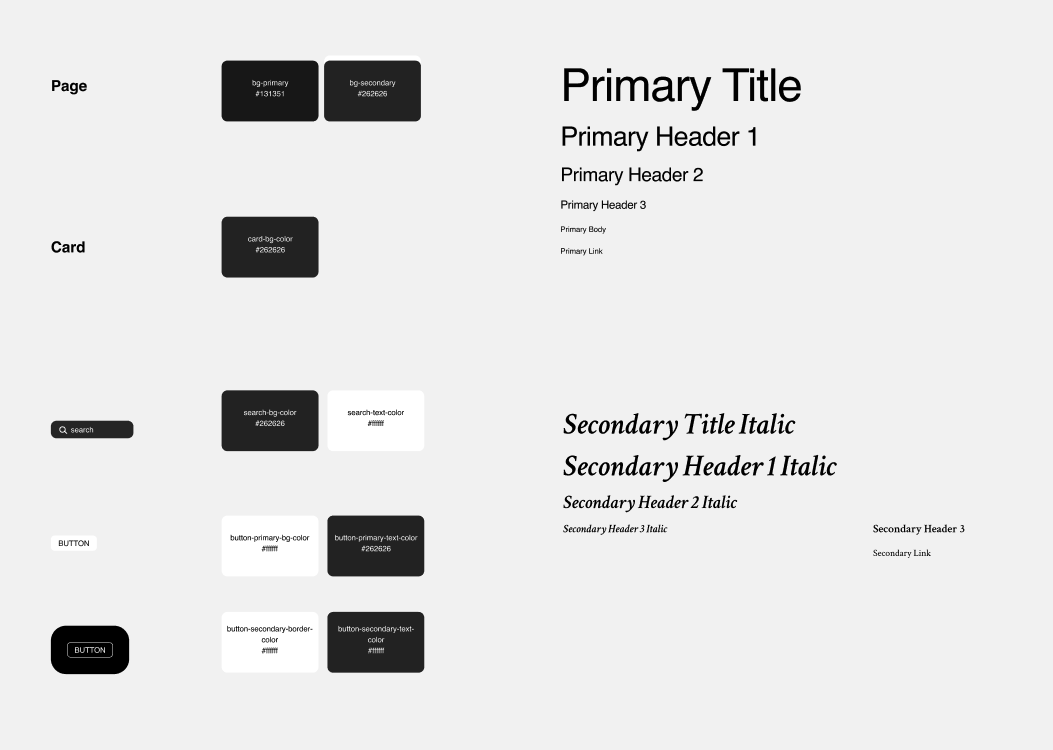
While certain paradigms where foreign to me, a lot of the core concepts were familiar enough to start prototyping. I began work with a few figma mockups to get a sense of the layout and feel for the aesthetic. In terms of theming, I aimed to keep it simple and dark - with elegant font styles like Helvetica and Crimson Text.
A handful of things have certainly changed since the initial designs, but I think that I maintained the unique feel of it. My intention was to
make it feel like an artsy Webflow portfolio…just without all the lag and slow hydration times. Thankfully Astro optimizes a lot under the
hood, especially with the <Image> component which is transformed into webp formats for smaller footprints over network requests. Moreover
Astro doesn’t ship any JS by default, just the scripts you specify - a return to form! No more slow load times.
To add some sprinkle of client-side interactivity, I looked into a free plugin called GSAP. With this library, I was able to create that buttery smooth
scrolling effect on all the pages as well as those cool trigger animations for certain sections. The secret sauce is to initialize the animations
in a <script> within the Layout.astro file.
gsap.registerPlugin(SplitText, ScrollTrigger, ScrollSmoother, Flip);
ScrollSmoother.create({
smooth: 2,
effects: true,
smoothTouch: 0.1,
normalizeScroll: true,
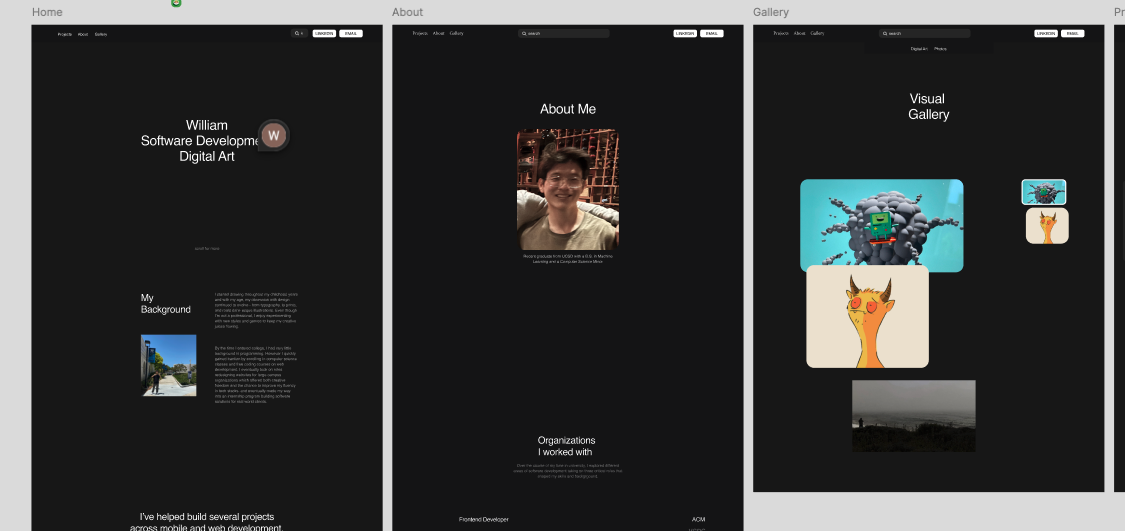
});One of the cooler things I did with this plugin is create the visual gallery page, which you can navigate to from the menu. I was inspired by a very similar design I came across online and decided to reverse engineer its behavior. To do this, I first utilized Astro’s Content Collections API which enabled me to dynamically load images from my project filesystem.
const images = await Astro.glob<{default: ImageMetadata}>('../../../public/images/gallery/*').then(files => {
    return files.map(file => file.default);
});
Next, I iterated over each image and attached a custom Scroll Trigger. When you scroll an image into the viewport, certain callbacks are triggered to visually emphasize the corresponding pinned image that shows your relative progress on the page. Succcessive images that enter the viewport will update the next pinned image while de-emphasizing the previous one.
scrollableImages.forEach((_, idx) => {
    const pinnedImage = document.querySelector(`#pinned-${idx}`) as HTMLElement;
    const originalZ = pinnedImage.style.zIndex;
    gsap.set(pinnedImage, { opacity: 0.5 });
    ScrollTrigger.create({
        trigger: `#scrollable-${idx}`,
        start: "top+=50% center",
        end: "bottom+=50% center",
        onEnter: () => gsap.to(pinnedImage, { opacity: 1, duration: 0.3, scale: 1.1, zIndex: 100, borderColor: "white", borderWidth: 2}),
        onEnterBack: () => gsap.to(pinnedImage, { opacity: 1, duration: 0.3, scale: 1.1, zIndex: 100, borderColor: "white", borderWidth: 2}),
        onLeave: () => gsap.to(pinnedImage, { opacity: 0.5, duration: 0.3, scale: 1, zIndex: originalZ, borderColor: "transparent"}),
        onLeaveBack: () => gsap.to(pinnedImage, { opacity: 0.5, duration: 0.3, scale: 1, zIndex: originalZ, borderColor: "transparent"}),
    })
})
With the animations in place, I moved onto my next bucket list item - searchable content. You ever use a website and they have that “search” function that allows you to find any information on their website? They’re most likely using a tool called Algolia. Lots of websites use this including Tailwind. It looked promising at first, but I later realized it’s a service that does use browser agents to index dynamic data in real time. Sure it’d be convenient but I was also concerned about the implications with privacy and cost.

To address this, I opted for an open source tool called Pagefind - which provides static site searching that indexes your website’s html at build time. This delivers blazingly fast search results with minimal compute overhead and bundle size. Getting started is as simple as running a npm install and importing the library inside your file. I also created a custom TypeScript interface to help with development.
const pagefind = await import("../../public/pagefind/pagefind.js");
pagefind.init();
interface Data {
    url: string,
    excerpt: string,
    meta: {
        title: string,
        image: string
    }
}
The kicker at this point was trying to create an inuitive search experience without React’s stateful framework. How do I display my search
results on the page if <script> variables can’t be used in JSX syntax? It was back to the old ways again, and after some thought, I decided
to just manipulate the DOM directly.
document.body.addEventListener("input", async(e: any) => {
    if (e.target.id !== 'search-input') return;

    // Clear the results in the UI
    while (searchResultsList.firstChild) {
        searchResultsList.removeChild(searchResultsList.firstChild);
    }
    pagefind.preload(e.target.value);
    const search = await pagefind.search(e.target.value, 300);
    const results = await search.results;
    if (results.length == 0 && e.target.value.length > 0) {
        let message = document.createElement("p");
        message.innerHTML = `<p class="text-(--color-gray)">No results found</p>`
        searchResultsList.appendChild(message)
    }
    else {
        results.forEach(async (result: any) => {
            const data = await result.data() as Data;
            let article = document.createElement("article");
            article.innerHTML =
            `
                <a href=${data.url.replace("/public", "")}>
                    <h3 class='primary-header-3 text-white'>${data.meta.title}</h3>
                </a>
                <p class='primary-body text-(--color-gray) line-clamp-1 overflow-ellipsis'>${data.excerpt}</p>
            `
            searchResultsList.appendChild(article)
        })
    }
})
All the code is doing here is attaching an event listener to the input element. This means, any input trigger will
reset the displayed search results and then perform an asynchronous search oepration on all my indexed files.
Once I find the data, I format each result into an article and render it inside a <ul> search result list inside
a modal.
I think that’s enough javascript for now lol. Overall, you can see that a lot of planning goes into this kind of stuff and sure, I could have used a no-code tool like Wordpress of Framer - but wheres the fun in paying money for premium animations and templates when you have the internet at your disposal. My philosophy is to be as resourceful as possible. All this translates into a portfolio which I can guarantee is faster than most you’ll see on app showcases. Trust me.
Now even though I boast, I realize that there are certainly more improvements to be made like SEO, better semantic markup, and keeping my code DRY. I’ll make sure to keep resolving any issues I find along the way. So stay tuned. Thanks for reading!